Sound reflections and reverberation management in a Voice Over Recording Studio.
What are sound reflections and reverberations and why do you need to care?
When we talk about sound reflections, think echo. If you are in mountains, a cave, large hall or an empty room say something or just clap your hands – that sound gets back to you as an echo ( reflections) and repeats itself over and over (reverberations) until it loses its energy and dies (reverberant decay). This is because the sound reflects from one hard surface and goes to the other and reflects over and over again until it loses its energy.
The same exact process happens in your studio, except that you might not hear it as loud as in a cave, but a sensitive microphone will pick it up and you recording will be “inadequate”.
HOW THE SOUND BEHAVES IN A VOICEOVER STUDIO
A sound energy can be reflected by the surfaces in the room and bounce around or it can be partially absorbed, lose some of that energy and bounce around a bit less, or it can hit an odd shaped object , break apart and go in different directions with diminished energy (diffused).These behaviors can be problematic in a recording studio – sound waves bouncing inside the room can interfere with each other, cancel or reinforce the energy at certain points, which makes recording in the room difficult.
How your recording is affected by the way sound waves behave in a room depends on a
number of factors – the frequency of the sound wave; the shape and dimensions of the room; the materials that the walls and ceiling and floor are made of and covered with; how many doors and windows are there, and where they are placed, location of the microphone and voice actor in relation to the nearest walls, etc., and the contents of the room ( furniture, tapestry, equipment etc.)
One of the biggest factors that determine what happens with sound in a room is the frequency of the sound wave. As we discussed in the previous article, lower frequency wavelengths are long, and sound waves are more powerful.
Low frequency sound waves cannot be reflected by a small obstacle, so it bends around objects in the room and passes through lighter materials. At mid and high frequencies , say 100Hz or so and above – sound waves are more straightforward and easier to control.
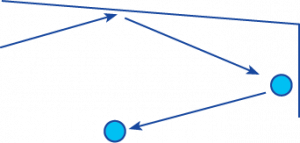
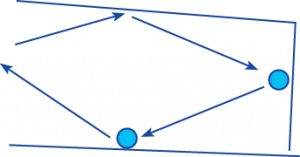
Their behavior in the room can be compared to that of a tennis ball: they bounce from hard surfaces and being slowed down (absorbed) by soft surfaces.
FIRST REFLECTION:
THEN IT WILL BOUNCE FROM A CORNER:
THEN FROM THE OTHER WALL:
And so on until it loses its energy. The harder and flatter the surface – the stronger the reflected sound and the longer it will be bouncing around before it dies.
(This is just a simplified example, in reality a surface has to have a dimension equal to a wavelength to reflect sound in this manner. So our 100Hz wave will bounce off a roughly 12 ft wide wall. But will diffract (bend around) around objects that have dimensions smaller than 12ft wide. Also, sound waves are omnidirectional, meaning that they go in all directions at once, so when they reflect they also interact and affect each other). However throw a ball against a pillow and it will stop, because the direct energy will be absorbed by the pillow. That’s the basic idea.
WHY REFLECTIONS ARE BAD FOR YOUR RECORDING
In reality a voice over actor is positioned right in front of a microphone, so the microphone will pick up the sound coming directly from you, the speaker, but it will also record the sound waves reflected off by nearby walls and other surfaces.
The problem is that the microphone will record the sound from the voice over actor a very short time before the sound reflected off the walls gets to it too. How long the delay depends on how far away the nearest reflective surface is. This delay between the two sound waves (direct and reflected) can result in phase differences in the waves.As the direct sound waves of your voice and the reflected sound combine, the time/phase delay can cause cancellations and/or reinforcements in the sound waves, changing the tonality of what you are recording. This effect is known as “comb filtering”. And if the tonality is changed, you are not recording what you are really saying, or rather not the way you say it.
ARE THERE BAD AND GOOD REFLECTIONS?
Well, ideally you do not want any reflections in your recording. You want only direct sound to be recorded. But some reflections are indeed worse than others.
First reflections
The worst and most powerful are the so- called first reflections. These are the sound waves that bounced the first time, less than 20 milliseconds or so after the direct sound. Sound travels at a rate of about one foot per millisecond, so that means that any reflective surface within about 10 feet or so of the recording position will cause problems. There are also Secondary (second bounce) and tertiary (third bounce) reflections.
Flutter echo
Flutter echo happens when the sound waves are reflected directly between two parallel surfaces – say opposing walls in a small room – back and forth. Try it in a smallish room with hard parallel bare walls: clap your hands and you’ll hear a rattling sound – that is flatter echo. Most apartment and house rooms have parallel walls, so flutter echo can be a real problem when you are recording with a microphone.
Reverberant decay
Reverberation is the sound left ringing in the room after the direct sound from the sound source stops. It is those secondary and tertiary reflections, it is that remaining reflected sound that tends to wash together. For most recording too much reverberation that lasts too long is a problem – recording clarity will be compromised, and there may be phase problems. Equally important is making sure that the reverberant decay across the frequency range is even. If the reverberant decay for high frequencies is different than for low frequencies, the room will have a characteristic sound that probably won’t be desirable – a bright ring, boomy low end, or uneven midrange. However, if the reverberant decay is too short, the room will have a dry, dead feeling and sound that will be uncomfortable.
HOW TO MANAGE REFLECTIONS AND REVERBERATIONS
If you are thinking of setting up your voice over recording studio you might be choosing a spot in a bedroom a walk in closet or may be in a spare room. If you start with an empty room with hard surfaces on the walls, ceiling and floors what do you do to manage reflections and reverberant decay? There are two different methods: absorption and diffusion, each of which is effective for solving certain problems. But in small rooms such as home recording studio diffusion is not as effective as absorption. We will stop on Diffusion briefly, because they are not exclusive and combination of the two methods can be used successfully.
DIFFUSION
“Diffusion” is breaking a single sound wave into smaller reflections and dispersing them in different directions. Because there are no big reflections going back to the microphone, first reflection problems are reduced, and because diffusive materials are irregular in shape, flatter echo is eliminated. Although reverberation won’t be eliminated, scattering and breaking up the reflections tends to result in a smoother reverberation at a lower level.While any irregular surface can break down reflections at some frequencies to a degree, to figure out exactly how to make a diffuser that evenly scatters a broad frequency range of sound waves requires specialized diffusion materials. Such specialized diffusors are hard to build and they can be expensive.
ABSORPTION
Remember the example of echo in the mountains? Now why is it so quiet when the snow is falling? That is because the snowflakes absorb the sound and speed up the reverberant decay. For voice over recording studios, absorption is the main method for managing first reflections in mid- and high-frequency range, flutter echo and reverberant decay.
The idea is to use sound absorption materials placed at the main reflection points to reduce –absorb – sound energy so that the level of the reflected sound waves is significantly quieter than the direct sound.
Absorption works best with high- and midrange frequencies. Lower frequencies require large quantities of absorptive material for effective energy reduction. Very high frequencies have very little energy compared to low frequencies, so thin, soft materials can be used to absorb them. As the frequency gets lower, thicker and heavier absorptive materials are required. Those thicker sound absorption materials are even more effective at controlling high
Frequencies. There is an array of sound absorption materials that can be used and we will talk in detail about it later. Most fall into the category of porous absorbers. These materials consist of mineral wool, acoustic blankets, clothing, curtains, carpets and acoustic foam. The sound-absorbing effect comes from the fact that the sound energy can penetrate the material on hitting the surface. Here, the sound energy is converted into heat energy, so that only a small part is reflected in the form of sound energy. In other words, the material has absorbed some of the sound. The sound absorption in acoustic foam and acoustic sound absorption blankets works differently.
Acoustic foam is a popular material for lining up the recording studios. They are often shaped in a conical or egg crate shape. The make of acoustic foam is different from the make of the packing foam even though they might look the same and even youtubers may claim they can stuff the packing foam in the box and it works great. Packing foam made out of CLOSED channel foam, so the air trapped in the channels provides more cushioning. But for the sound to be absorbed it has to have a way to enter the material. This is why acoustic foam is made with OPEN channels. So called “Open Cell Foam” The sound gets in and then travels through the twisted channels bouncing off the internal walls and losing its energy. The reason for the egg crate surface of the foam is to increase the absorption area and allow more opportunity for the sound to get in. The thicker the foam the more sound it absorbs. This is why unechoic chamber lined up with acoustic foam with two feet deep wedges.
The other difference is that acoustic foam is generally rated as fire retardant – an important factor because some types of foam are extremely flammable and therefore not safe for residences and businesses. Acoustic blankets on the other hand work differently. Unlike moving blankets filled with low quality mixed with recycled polyester and cotton fibers, specialized acoustic blankets known as “Producer’s choice”, filled with highly absorptive cotton. As the sound gets in it agitates the cotton fibers and by making them vibrate it loses its own energy.The thicker the blanket, the more filler it has, the better its sound absorption efficiency and broader its frequency range. Using blankets in pleated fashion increases the absorption surface and increases the total quantity of absorption material in the room.
Fiberglass Insulation.
Glass fiber is another common absorptive material. The rigid variety such as Owens Corning 700 fiberglass series provides decent absorption in high and mid frequency range. Rock wool Safe and Sound is used to fill the space between drywall during construction for better soundproofing. It also can be used in the corners as bass trap. RockWool and Glass fiber, of course, can be a major irritant, so make sure to cover it and do not disturb, to prevent strands from getting into the air. Regular household materials such as soft furniture with fabric upholstery, pillows, curtains and drapes, blankets, carpet and so on, all absorb sound to one degree or another at mid and high frequencies.
HOW MUCH ABSORPTION TO USE?
So you have to get rid of reflections so do you just line up the walls, floor and ceiling of your studio with sound absorbing material and start recording? But it’s not quite that simple. Many types of absorptive materials only work well on higher frequencies, leaving midrange sound bouncing around without much control. This can result in an odd, dark –sounding room with no high end. If you have too much absorption in the upper frequencies, the mid- and high-frequency reflections will be reduced, but the bass frequencies will be bouncing around, resulting in a boomy, bassy room that sounds muddy. Too much of the overall absorption and the room will sound too dead and it will be uncomfortable to work in.
The idea is to use just enough to control first reflections and to tame reverberation decay. Keep in mind that you can always add more absorption if the room still seems too live.
The right balance is the key to finding the right amount of absorption in the proper location so they will be as effective as possible – enough to control the mid and high range, and enough bass traps to end up with a balanced room response and an even reverberant decay across the frequency range.
HOW DOES IT RELATE TO VOICEOVER RECORDING?
The purest and cleanest of all is the direct sound energy. This is the sound that travels in a direct (straight) line from the voice actor to the microphone. Sound energy reflected from objects in a room confuse the direct sound of our voice and make recording “mudded”. You want to have everything in the recording,emotions and different intonations and do not want to hear any sonic additions from your recording room. Unfortunately, you must record in a “box” or room that has walls, ceiling, and a floor. When you speak into a microphone the sound radiates in many directions. Sound of your voice goes through the room until it hits an object or wall, then it reflects back and gets recorded by your microphone over what you are saying at the moment. Unlike the reflections in a control room where the sound comes from a speaker and reachesthe engineer at some distance, in voice over recording you position yourself right in front of the microphone. So your first reflections would be the reflections from the nearest reflective surface: laptop screen, walls to the right or left from you and a wall in front or behind you, if you are sitting close to a wall. Wherever the closest reflective surface is – that will be your first reflection point to treat coustically.Do not forget the ceiling and the floor. They are also reflective. Reflections arrive at your microphone delayed in time and add sonic distortions to your voice narration. To minimize the sound of the room sound absorption works best for small recording studios such as home voice over studio.
For a voice over actor who does individual work (one person commercial or book narration), having a small acoustic booth might be an easier and more effective and practical way to create the great sound recording environment, rather than acoustically treating the whole room.
Portable or small acoustic vocal booths are easy to set up and also easy to take with you if you have to move.
Untreated reflective surface reflecting the sound back at the microphone.
Reflective surface was treated with acoustic blanket. Reflected sound comes back with considerably reduced energy.
The right balance is the key to finding the right amount of absorption in the proper location so they will be as effective as possible – enough to control the mid and high range, and enough bass traps to end up with a balanced room response and an even reverberant decay across the frequency range.
VocalBoothToGo.com
(VocalBoothToGo.co.uk) specializes in providing effective and inexpensive acoustic room treatment products, such as Producer-s choice acoustic blankets for sound reflection control, Noise control products, mobile sound booth, portable vocal booths and Vocal booth Rentals. support@vocalboothtogo.com
